
Peptide Education & Getting Started
Peptides can be powerful tools when used correctly. This guide helps you understand what to do when your peptides arrive, how to store them properly, and the essential safety steps every user should follow. Always see your product instructions for details.
When Your Peptides Arrive
When your package arrives, take a moment to unbox everything slowly. This protects product quality and prevents simple mistakes.
- Verify the name and quantity on each vial match your order confirmation.
- Check that no vials are cracked, leaking, or unsealed.
- Confirm you received all expected items (vials, bacteriostatic water if ordered, syringes, alcohol wipes, etc.).
- If anything looks incorrect or damaged, do not use the product. Contact support first.
Inspecting Your Vials
Before storing or preparing anything, visually inspect each vial.
- Dry (lyophilized) peptides should appear as a white or off-white powder or “cake” at the bottom.
- No moisture droplets, dark spots, or residue should be present.
- Liquid peptides should be clear and free of particles.
- If the vial looks unusual or the seal is compromised, set it aside and contact support.
Basic Storage Guidelines
Proper storage protects stability and product quality. Always see your instructions for details.
Dry (unmixed) peptides
- Store in a cool, dry place away from heat and humidity.
- Keep out of direct sunlight.
- A closed cabinet or drawer is ideal.
- Refrigeration is optional but not required—avoid moisture exposure.
- Freezing is not recommended unless your product instructions specifically allow it.
Mixed (liquid) peptides
- Store in the refrigerator unless your instructions state otherwise.
- Keep the vial upright with the cap securely in place.
- Do not freeze mixed peptides.
Never store peptides in a hot car, in direct sunlight, or near heat sources like stoves or heaters.
Handling & Hygiene Basics
Clean handling helps preserve both product quality and safety.
- Wash hands thoroughly before handling any supplies.
- Use a clean, flat, disinfected surface.
- Wipe vial tops with alcohol before inserting a needle.
- Keep syringes sealed until use.
- Never reuse needles.
- See your instructions for details.
When NOT to Use a Product
Pause and contact support if you notice any of the following:
- The vial is cracked, leaking, or unsealed.
- The dry powder is discolored or unusual.
- The liquid is cloudy or contains particles.
- The package was exposed to extreme heat.
- The product is past its expiration date.
- See your instructions for details.
When in doubt, do not use a questionable vial. Contact support first.
When to Contact Support
We prefer you ask questions rather than guess.
- Your shipment arrived damaged or warm.
- You are unsure how a vial should look.
- You have questions about storage.
- You are preparing to mix a peptide for the first time.
- See your instructions for details.
If you're ever unsure, email us at [email protected].
Injection Basics (Universal Instructions)
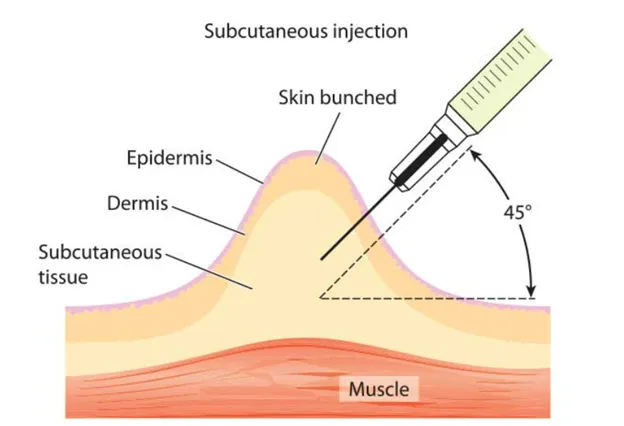
These steps apply to most subcutaneous peptide injections (into the fat just under the skin). If your individual protocol says something different, always follow those instructions first.
The goal is simple: clean hands, a clean site, the right angle, and safe disposal. You can do this one calm step at a time.
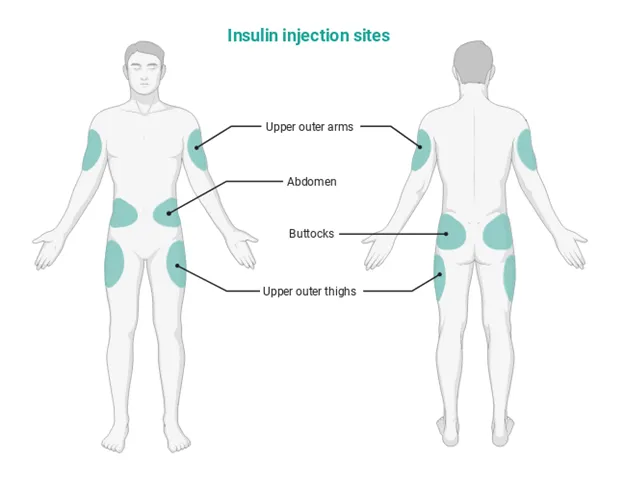
Where to Inject (Subcutaneous Areas)
Subcutaneous injections go into the fat layer just under the skin, not into the muscle. Common areas include:
- Lower abdomen – at least 2 inches away from the belly button
- Outer thigh
- Upper butt / love-handle area
- Back of the upper arm (if someone else is injecting for you)
Rotate your injection sites to avoid irritation, soreness, or small lumps under the skin.
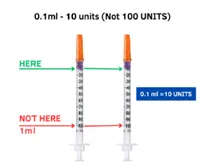
Understanding Your Syringe (Units & mL)
Most insulin syringes are labeled in units. This is just a way of measuring volume in the syringe—it does not equal milligrams or micrograms of a peptide.
- 1 mL syringe = 100 units
- 0.5 mL syringe = 50 units
- 0.3 mL syringe = 30 units
If your protocol says, for example, “10 units,” you will draw up to the line marked 10 on the syringe—not 10 mg.
How to Do a Subcutaneous Injection (Step-by-Step)
- Wash your hands with soap and water and let them dry completely.
- Clean the injection site with an alcohol pad and let it air dry. Do not blow on it or touch it again.
- Prepare your syringe and draw up the number of units listed in your personal instructions.
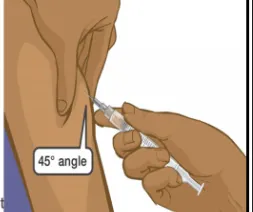
- Pinch the fat – gently grab 1–2 inches of skin between your thumb and fingers to create a small fold.
- Insert the needle at about a 45° angle into the pinched skin. (Very lean individuals may be guided to use a 90° angle by their provider.)
- Inject slowly by pressing the plunger down gently. Take your time; there is no need to rush.
- Remove the needle straight out and apply light pressure with a clean cotton pad or gauze. Do not rub the area.
- Dispose of the syringe safely in a sharps container—never in the regular trash.
What a Normal Injection May Feel Like
Many people notice a slight pinch, mild pressure, or a small temporary bump under the skin. These usually fade within minutes.
Stop and seek guidance if you notice strong pain, spreading redness, swelling, streaking, trouble breathing, or other signs of allergic reaction.
Sharps Disposal
Used needles and syringes must go into a proper sharps container, not the household trash or recycling. You can purchase one at any pharmacy, medical supply store, or online.
Example option: Sharps container on Amazon (or use any equivalent container approved in your area).